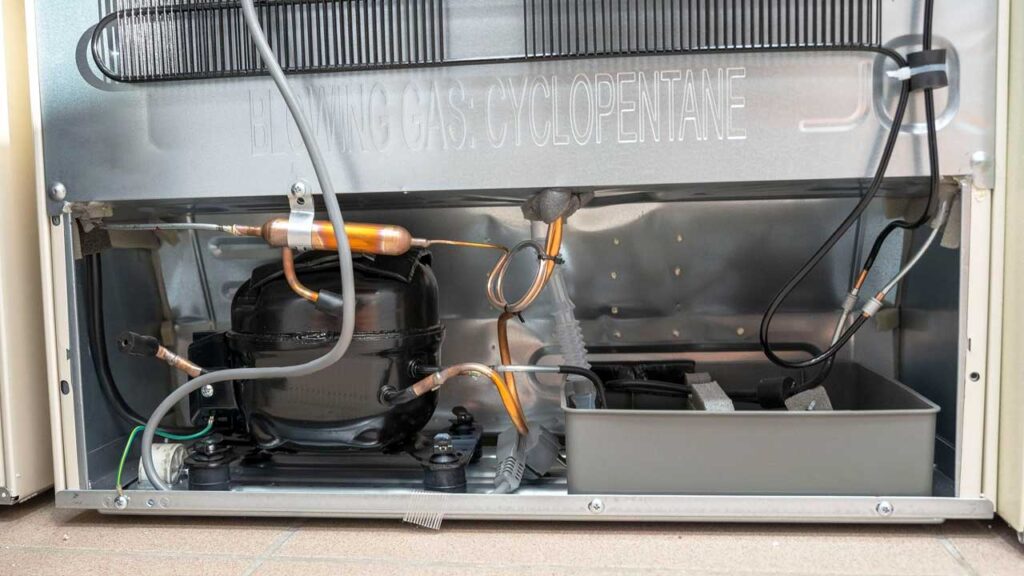
The refrigerator compressor is one of the most important parts of your fridge. It is responsible for compressing the refrigerant gas and circulating it through the evaporator and condenser coils, creating the cooling effect that keeps your food fresh.
However, like any other appliance component, the compressor can wear out or fail over time, causing your fridge to stop cooling properly or make loud noises. If this happens, you may need to replace the compressor with a new one.
Replacing a refrigerator compressor is not an easy task. It requires some technical skills, special tools, and safety precautions. You also need to make sure that you have the right replacement compressor for your fridge model and that you follow the manufacturer’s instructions.
If you are not confident or experienced in doing this kind of repair, it is better to call a professional technician to do it for you. However, if you are willing to take on the challenge, this article will guide you through the steps of replacing a refrigerator compressor by yourself.
What You Will Need
Before you start the compressor replacement process, you will need to gather the following tools and materials:
- A new compressor that is compatible with your fridge model. You can check the model number of your old compressor and look for a matching one online or at a local appliance store. Alternatively, you can contact the manufacturer of your fridge and ask for their recommendation.
- A refrigerant gas that matches the type of your fridge. Most modern fridges use either R600a or R134a as refrigerants, but some older models may use different types. You can check the label on your old compressor or on the back of your fridge to find out what kind of refrigerant you need.
- A two-valve manifold refrigeration pressure gauge that can measure both high and low pressure in the refrigeration system.
- A vacuum pump that can create a vacuum in the refrigeration system and remove any air or moisture from it.
- A refrigerant scale that can measure the amount of refrigerant gas that you add or remove from the system.
- A brazing equipment that can cut and join metal pipes using heat and solder rods.
- A solder rod that can melt and join metal pipes together.
- A flux that can help clean and prepare metal surfaces for soldering.
- A screwdriver set that can help you remove and attach screws from different parts of the fridge.
- A socket set that can help you remove and attach nuts and bolts from different parts of the fridge.
- An adjustable wrench that can help you loosen and tighten various fittings and connections in the refrigeration system.
- A pair of safety goggles that can protect your eyes from sparks, flames, or flying debris during brazing.
- A pair of gloves that can protect your hands from heat, sharp edges, or chemicals during brazing or handling refrigerant gas.
What You Will Learn
In this article, you will learn how to replace a refrigerator compressor in 11 steps:
- Turn off the power supply and unplug the fridge from the wall outlet.
- Remove the access panel at the back or bottom of the fridge to expose the compressor and other components of the refrigeration system.
- Identify and disconnect the wires that connect the compressor to the electrical circuit board or relay switch.
- Unscrew and remove the mounting bolts that secure the compressor to the fridge frame.
- Carefully lift and remove the old compressor from the fridge.
- Install a new filter drier, capillary tube, and access valve in place of the old ones on the refrigeration system.
- Place and secure the new compressor on the fridge frame using new mounting bolts.
- Connect and solder the new compressor to the refrigeration system using brazing equipment, solder rod, and flux.
- Connect and attach the wires from the new compressor to the electrical circuit board or relay switch.
- Vacuum out any air or moisture from the refrigeration system using a vacuum pump and a pressure gauge.
- Refill the refrigeration system with new refrigerant gas using a refrigerant scale and a pressure gauge.
Step 1: Turn Off The Power Supply And Unplug The Fridge
The first step in replacing a refrigerator compressor is to turn off the power supply and unplug the fridge from the wall outlet. This will prevent any electrical shocks or damage to the fridge or yourself during the repair process. To do this, follow these steps:
- Locate the power cord of your fridge at the back or bottom of it.
- Unplug it from the wall outlet by pulling it gently but firmly.
- If your fridge has a dedicated circuit breaker in your home’s electrical panel, locate it and turn it off as well.
Step 2: Remove The Access Panel
The next step is to remove the access panel at the back or bottom of your fridge to expose the compressor and other components of the refrigeration system. The access panel is usually a metal or plastic cover that is secured by screws or clips. To remove it, follow these steps:
- Locate the access panel on your fridge. It may be on the back, bottom, or side of it, depending on the model and design of your fridge.
- Use a screwdriver or a socket wrench to loosen and remove the screws or clips that hold the access panel in place.
- Carefully lift and remove the access panel from the fridge and set it aside.
Step 3: Identify And Disconnect The Compressor Wires
The third step is to identify and disconnect the wires that connect the compressor to the electrical circuit board or relay switch. The compressor wires are usually color-coded and labeled with letters or numbers. To disconnect them, follow these steps:
- Locate the compressor wires on your fridge. They are usually attached to a small black box or a white plastic connector near the compressor.
- Use a screwdriver or a socket wrench to loosen and remove the screws or nuts that secure the wires to the box or connector.
- Carefully pull and disconnect the wires from the box or connector and set them aside.
Step 4: Unscrew And Remove The Compressor’s Mounting Bolts
The fourth step is to unscrew and remove the mounting bolts that secure the compressor to the fridge frame. The mounting bolts are usually four metal rods with nuts on both ends that go through holes on the compressor and the frame. To remove them, follow these steps:
- Locate the mounting bolts on your fridge. They are usually on the four corners of the compressor.
- Use a socket wrench or an adjustable wrench to loosen and remove the nuts from both ends of each bolt.
- Carefully pull and remove the bolts from the holes on the compressor and the frame and set them aside.
Step 5: Carefully Remove The Old Compressor
The fifth step is to carefully lift and remove the old compressor from the fridge. The compressor is a heavy metal cylinder with pipes and fittings attached to it. To remove it, follow these steps:
- Grab the compressor by its sides or handles and gently lift it up from its position on the fridge frame.
- Be careful not to damage or bend any of the pipes or fittings that are connected to the compressor or the refrigeration system.
- Set the old compressor aside in a safe place.
Step 6: Install A New Filter Drier, Capillary Tube, And Access Valve
The sixth step is to install a new filter drier, capillary tube, and access valve in place of the old ones on the refrigeration system. The filter drier is a small metal cylinder that filters out any moisture or contaminants from the refrigerant gas. The capillary tube is a thin metal tube that regulates the flow of refrigerant gas from the condenser to the evaporator. The access valve is a small metal valve that allows you to add or remove refrigerant gas from the system. To install them, follow these steps:
- Locate the filter drier, capillary tube, and access valve on your fridge. They are usually attached to different pipes or fittings on the refrigeration system near the compressor.
- Use a brazing equipment, solder rod, and flux to cut and remove the old filter drier, capillary tube, and access valve from their respective pipes or fittings.
- Use a brazing equipment, solder rod, and flux to attach and solder the new filter drier, capillary tube, and access valve to their respective pipes or fittings.
Step 7: Install The New Compressor
The seventh step is to place and secure the new compressor on the fridge frame using new mounting bolts. The new compressor should be compatible with your fridge model and have the same type of pipes and fittings as the old one. To install it, follow these steps:
- Place the new compressor on the fridge frame in the same position as the old one.
- Align the holes on the compressor with the holes on the frame.
- Insert the new mounting bolts through the holes on the compressor and the frame.
- Use a socket wrench or an adjustable wrench to tighten the nuts on both ends of each bolt.
Step 8: Connect And Solder The New Compressor To The Refrigeration System
The eighth step is to connect and solder the new compressor to the refrigeration system using brazing equipment, solder rod, and flux. The new compressor should have the same type of pipes and fittings as the old one. To connect them, follow these steps:
- Locate the pipes and fittings that connect the compressor to the refrigeration system. They are usually color-coded and labeled with letters or numbers.
- Use a brazing equipment, solder rod, and flux to attach and solder the pipes and fittings from the new compressor to their respective counterparts on the refrigeration system.
Step 9: Vacuum Out Any Air Or Moisture From The Refrigeration System
The ninth step is to vacuum out any air or moisture from the refrigeration system using a vacuum pump and a pressure gauge. Air or moisture can cause corrosion, leaks, or inefficiency in the refrigeration system. To vacuum it out, follow these steps:
- Locate the access valve on your fridge. It is usually a small metal valve with a cap on it near the compressor or the filter drier.
- Remove the cap from the access valve and attach one end of a hose from the vacuum pump to it.
- Attach the other end of the hose from the vacuum pump to one of the ports on the pressure gauge.
- Turn on the vacuum pump and let it run for about 15 minutes or until the pressure gauge reads zero or below.
- Turn off the vacuum pump and disconnect the hose from the access valve and the pressure gauge.
- Replace the cap on the access valve.
Step 10: Refill The Refrigeration System With New Refrigerant Gas
The tenth step is to refill the refrigeration system with new refrigerant gas using a refrigerant scale and a pressure gauge. Refrigerant gas is what creates the cooling effect in your fridge by changing its state from liquid to gas and back. To refill it, follow these steps:
- Locate the access valve on your fridge. It is usually a small metal valve with a cap on it near the compressor or the filter drier.
- Remove the cap from the access valve and attach one end of a hose from a refrigerant canister to it.
- Attach the other end of the hose from the refrigerant canister to one of the ports on the pressure gauge.
- Place the refrigerant canister on a refrigerant scale and zero it out.
- Turn on the refrigerant canister and let it release gas into the refrigeration system until you reach the desired amount according to your fridge model and manufacturer’s instructions. You can check the amount by reading the scale and the pressure gauge.
- Turn off the refrigerant canister and disconnect the hose from the access valve and the pressure gauge.
- Replace the cap on the access valve.
Step 11: Reattach The Access Panel And Plug In The Fridge
The final step is to reattach the access panel and plug in the fridge. The access panel is the metal or plastic cover that you removed in step 2 to expose the compressor and other components of the refrigeration system. To reattach it, follow these steps:
- Locate the access panel on your fridge. It may be on the back, bottom, or side of it, depending on the model and design of your fridge.
- Align the access panel with the holes or slots on the fridge frame.
- Use a screwdriver or a socket wrench to tighten and secure the screws or clips that hold the access panel in place.
- Plug in the power cord of your fridge to the wall outlet by pushing it gently but firmly.
- If your fridge has a dedicated circuit breaker in your home’s electrical panel, locate it and turn it on as well.
Congratulations! You have successfully replaced your refrigerator compressor by yourself. You can now enjoy your fridge’s cooling performance and save money on repair costs. However, if you encounter any problems or difficulties during or after the replacement process, please contact a professional technician for assistance.
In this article, you learned how to replace a refrigerator compressor by yourself in 11 steps. You also learned what tools and materials you need, what precautions you should take, and what benefits you can get from doing this repair. Replacing a refrigerator compressor is not an easy task, but it is possible if you follow the instructions carefully and have some technical skills and confidence.
However, if you are not sure or comfortable with doing this kind of repair, it is always better to call a professional technician to do it for you.